Saturday, September 30, 2017

Spotlight Saturday - Pumpkin Pie Waffles - Gluten Free


Fall is finally here and the weather is cool enough to crave the comfort foods of Autumn.  My hubby loves breakfast and today I made a favorite of his, Pumpkin Pie Waffles.  These waffles are spiced with lots of cinnamon, nutmeg and ginger.  This spice combo is the best!  These waffles freeze well and make great ice cream sandwiches.


Here is the recipe for gluten free pumpkin pie waffles:

1. Combine and mix well: 4 eggs, 1 cup yogurt, 1 cup pumpkin, 1/2 c cider, 8 tablespoons of melted butter or oil and 2 tablespoons of dark brown sugar.

2. Add: 2 teaspoons cinnamon, 1/2 teaspoon nutmeg, 1 teaspoon ginger and 1/2 teaspoon of salt and mix well.

3. In a separate bowl combine: 2 cups of gluten free oat flour, 1 tablespoon baking powder and a teaspoon of baking soda.Mix the dry ingredients into the batter and mix gently.

4. Cook on waffle iron for 4 -5 minutes

The dough will be thicker than you might be used to making for waffles.

I also add one of the following to the batter just before baking; cooked crumbled bacon, chopped nuts, pumpkin seeds or diced apples. 

Top your waffle with butter and maple syrup and enjoy!


Turn your breakfast into dessert by adding Graeter's  Pumpkin ice cream!  It's the perfect combo to really satisfy your craving for pumpkin. Can't find Graeter's ice cream in your grocery store?  Shop here!


My inspiration for this recipe comes from Ken Haedrich's Country Breakfasts, Four Seasons of Cozy Morning Meals. I replaced the whole wheat flour with gluten free oat flour, added pumpkin and adjusted other ingredients to accommodate our taste buds. 

We both love anything pumpkin so you will be seeing quite a few recipes with this ingredient over the next couple of months on Saturday Spotlight.

Do something creative today!

Debi

Thursday, September 28, 2017

Lovely Sunflowers From Painted Harvest

This past Sunday was my oldest daughter's 46th birthday. It's hard to believe this many years have past since she was just a baby in my arms.  She is now a great Mom of 4 adorable grandchildren.

She has a great sense of humor (almost always).  Of course I think she is beautiful and very smart.  By the way, she reminds me of me. 😍

She likes sunflowers so I thought the Painted Harvest stamp set would be perfect for her birthday card. 


Supplies: Whisper White, Crushed Curry and Cherry Cobbler cardstock; Crushed Curry, Cherry Cobbler and Soft Suede Ink; Birthday Delivery and Painted Harvest stamp sets; Wink of Stella and Stampin' UP Rhinestones.

I forgot to take a picture of the envelope before I mailed it.  I used two sentiments from Five for All. Can you guess which two?


Tuesday, September 26, 2017

Purple Butterfly Birthday Card


This past Saturday was my assistant's birthday.  She is a lovely young talented women who make miracles happen in the workplace. Her favorite colors are purple and black.  She is way too young for a black birthday card so purple it is!


Hope your birthday weekend was awesome Nikki!

Supplies: Darice embossing folder, Stampin' UP! Embosslits Beautiful Wings, purple rhinestones and purple cardstock.


Do something creative today!


Sunday, September 24, 2017

Autumn Breeze and FMS 306


I love the  swirl of leaves on this paper.  It reminds me of a fall breeze and how busy we all become at this time of the year.  The sentiment works perfect to remind us to take a moment and be thankful for what we have. The copper background adds a nice shiny affect to the card. You can find more details on the measurements for the card HERE

The inspiration for this card came from Dawn Griffith.  I got an adorable Halloween card from her in the mail last week.  Thanks Dawn!


Please check out all the entries HERE for Freshly Made Sketches 306.  Lots of inspiration for your fall and holiday cards.


Do something creative today.


Saturday, September 23, 2017

Saturday Spotlight - Hemstrought's Bakeries

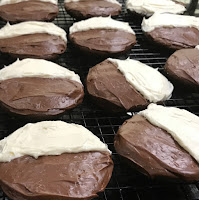
I am from central New York (Syracuse) and moved to Cincinnati over 25 years ago.  There are several New York delicacies I still miss. One of them being what I refer to as half moons.  Others call these cookies black and whites.  Hemstrought's Bakeries in Utica, New York shared the recipe they have been using since 1920 and I was thrilled when I found it on the web one day 5 years ago.

I have been promising my good friend Debbie I would make these for well over a year.  Well last Saturday seemed to be the perfect opportunity.  It was Gourmet Club night, I was responsible for dessert and Debbie is part of the Club.

These cookies are super easy to make.  The dough is thick and rich.  The recipe states to make 3" round circle but I recommend you make them a little smaller.  The cookies expand quite a bit.  I made 2.5" circles as seen in the picture on the left.


Here are the baked cookies after rising.  Do not over bake! The cookies should be moist in the middle.   You MUST wait unit the cookies are completely cooled before removing from the parchment paper.  Otherwise you have a sticky mess!


The frostings are awesome!  I often use the vanilla frosting for cupcakes or cake.  It's a great fluffy buttercream delight.  I could eat it by spoonfuls!  If you are not fond of bittersweet chocolate you can use all semi-sweet chocolate morsels in the chocolate frosting.  I have made it both ways and either works.  As you can see from the picture on the left you frost the bottom of the cookies not the top.


Here is the recipe and the directions.

The Original Hemstrought Bakery Half-Moon Cookie
Cook time: 40 Min  Prep time: 40 Min  Serves: 30 (2 1/2 dozen cookies)
Ingredients
COOKIES
3 3/4 c all purpose flour
3/4 tsp baking powder
2 tsp baking soda
2 1/4 c granulated sugar
1 c butter, cubed
3/4 c cocoa powder, sifted
1/4 tsp salt
2 large eggs
1 tsp pure vanilla extract
1 1/2 c milk
FROSTING - CHOCOLATE
3 1/2 oz bittersweet chocolate
3 1/2 oz semi-sweet chocolate
1 Tbsp butter
4 1/3 c confectioner's sugar
2 Tbsp corn syrup
1 tsp pure vanilla extract
1 pinch salt
1 c boiling water
FROSTING - VANILLA
7 c confectioners' sugar
1 c butter, cubed, room temp
1/2 c vegetable shortening
7 Tbsp milk
1 Tbsp pure vanilla extract
1 pinch salt
Directions
1. Preheat oven to 350°.
2. Sift together flour, baking powder, and baking soda in a medium bowl and set aside.
3. Put sugar, butter, cocoa and salt in bowl of mixer and beat on medium speed until fluffy. Add eggs and vanilla and continue to beat. Add half the milk, then half the flour mixture, beating after each addition until smooth; repeat with remaining milk and flour mixture.
4. Spoon or pipe batter onto parchment-lined baking sheets, making 3'' rounds 2'' apart. Bake until cookies are set, about 12 minutes. Allow to cool, then remove from parchment.
5. Frosting - Chocolate: Melt chocolates and butter in the top of a double boiler over simmering water over medium heat. Add confectioners’ sugar, corn syrup, vanilla, salt and 6 tbsp. boiling water - mix to a smooth, stiff paste with a rubber spatula. Thin icing with up to 8 tbsp. more boiling water. Icing should fall from a spoon in thick ribbons. Keep warm in a double boiler over low heat.
6. Frosting - Vanilla: Put sugar, butter, shortening, milk, vanilla and salt in a bowl. Beat on low speed to mix, then increase to medium and beat until light and fluffy.

7. Using a metal spatula, spread about 1 tbsp. of warm fudge icing on half of the flat side of each cookie. Spread the other half of each cookie with 2 heaping tbsp. vanilla icing.

Do something creative today!

Debi

Thursday, September 21, 2017

Alternative Paper Pumpkin Gratitude Oct. 2016

Finally took a stay vacation and started to get caught up on my Paper Pumpkin kits.  I never seem to have time to play with these kits.  However come February 1, 2018 that will all change.  Retirement, here I come. I have soooo many projects in the queue!


I love shaker cards and this kits was a great opportunity to play with sequins and beads.  Someone on Pinterest suggested putting glitter paper behind these leaves and I just love the affect.

I used Tranquil Tide cardstock as the card base.  Love this color combo!

Sentiment is from All Things Thanks.

I trimmed the leave cut out to 2 " before I made the shaker component of the card. 

It is going to a very special person who encourages a team of crafters to not be perfect, but be better than you were yesterday.


Here is a similar version of the card without trimming the shaker component.

Great kit with so many options.  All the Paper Pumpkin Kits offer a huge variety of options. Pinterest is loaded with alternative ideas for each kit.

Sentiment is from Background Bits Hostess Set.

Do something creative today!

Debi


Tuesday, September 19, 2017

Male Birthday Card - Beer Makes You Happy


 Happy Tuesday fellow crafters.  So glad you stopped by.  Today I am sharing a great card for any male who loves beer. My favorite son and favorite son-in-law fall into that category and they just happen to have birthdays that are one day apart. Very convenient for me! I made two cards from one design.  

 
When you open the card it says "Birthday Wishes" in big bold letters.  

Scott and Mike I hope you enjoyed your card.  You should be able to buy quite a few beers this weekend!😉


The background of the card is embossed with Stampin' UP!'s Hexagon Embossing Folder.  The Happy sentiment for Celebrations Duo is embossed on Basic Black cardstock cut  at 2 x 5 1/2 .  The silver mat is cut at 2 1/4 x 5 1/2.  The silver circle is cut from Stitched Shapes Framelits. The beer glasses from Mixed Drinks are colored with Copic markers and covered with Papier glass finish and then fussy cut. The foam was made with Liquid Applique. A few Black Rhinestone Jewels and you are done.

Do something creative today!

Debi

Sunday, September 17, 2017

Shimmery Fall Watercolor Background Card

Welcome to the Paper Maven! Glad you stopped by today.   Hope everyone is having a wonderful weekend.  It's been busy for me.  Last night a group of our friends got together for Gourmet Club.  It was our turn to make dessert. I made Half Moon Cookies (Utica, New York style).  I will be sharing pictures and recipe next Saturday.  

Today I want to share a lovely fall card created with watercolor paper Distress Inks and Perfect Pearls. There is a beautiful shimmer all over the card that is really hard for me to capture in a photo.    

I love how this design allows the sentiment to be the focal point of the card.    

To create the fall coloring I wet watercolor paper, applied ink to an acrylic block, spritzed the ink on the block and applied it to the watercolor paper.  I repeated the process for each color of ink used.

The fishtail element was cut from watercolor paper that had been spritzed with Heirloom Gold Perfect Pearls.

The sentiment is from Simon Says.  The leaves are from Stampin' UP!'s Botanical Builder Framelits. The pearls and copper thread is also from Stampin' UP!

I used the following inks: Squeezed Lemonade, Fossil Amber, Spiced Marmalade and Ripe Persimmon.

Thanks for stopping in!

Do something creative today.

Debi

Saturday, September 16, 2017

Spotlight Saturday - Stampin' UP!


Welcome crafters to another Saturday Spotlight! Embossing is one of my favorite techniques! But, did you know there are many ways to emboss? Watch as Andrea demonstrates three additional embossing techniques: water embossing, embossing in any color, and faux metal embossing.   

Thursday, September 14, 2017

Painted Autumn - Wish Big


Happy Thursday everyone!  Fall is a busy time for me with lots of birthdays, holidays and anniversaries.  Today's card will arrive in someone's mailbox pretty soon.

The Paper Maven - Images @ Stampin' UP!

I love Stampin' UP's new Painted Autumn  DSP.  When the package arrived I fell in love (not hard for me to do since paper is my addiction) with the first patterned paper in the package and I used it in this card.  

The swirl  reminds me of a fall breeze with leaves floating about. There is nothing better than a brisk walk with the colors of fall falling around you. Hopefully I captured that ambiance with this card. By the way, don't you think the colors are just gorgeous?

The following steps will help you recreate the card.

 1. Start with Very Vanilla cut at 5 1/2 x 8 1/2, scored at 4 1/4.
 2. Add Copper Foil cut at 5 1/4 x 4.
 3. Cut a second Copper Foil at 5 1/8 x 3 7/8
 4. Cut (from the center of DSP) a piece 5 1/8 x 3 5/8
 5. Cut the above into 3 pieces 5 1/8 X 1 1/2, 1 1/4, 7/8;  arrange and adhere to #3;
 6. Add a piece of Burlap Ribbon
 7. Adhere to #2
 8. Ink a Foil Snowflake back with Cajun Craze.
 9. Stamp/emboss the starburst from Cheers To The Year stamp set and cut out with 2" punch.
10. Cut a 1 3/8 Copper Foil circle (punch from center of #2)
11. Stamp any sentiment ( I used "Wish Big" from A Dozen Thoughts) and cut out with 1 1/2 circle  punch.
12 Arrange 8-11 as pictured and add to the card with Dimensionals.
13 Add a few Rhinestones

If you enjoyed my card leave me a comment.  I really enjoyed making it!

Do something creative today.

Debi


Monday, September 11, 2017

Freshly Made Sketches #304


Images @ Stampin' UP!


 Thanks for stopping by today.  This sketch  below shouted out to me "shaker card".  So,  that is what I made for you today.  I followed the sketch  exactly.  This will be a great Halloween card to send to one of my 7  grandchildren.


Stampin' UP! supplies used include:  Basic Black and Very Vanilla cardstock, Pumpkin Pie Glimmer Paper, Spooky Night DSP, Spooky Cat stamp set, Metallics Sequin Assortment, Layering Circle Framelits, acetate, Cat Punch and Vintage Crochet Trim.


Do something creative today!

Saturday, September 9, 2017

Spotlight Saturday - American Red Cross

Today's Spotlight Saturday focuses on all the wonderful things the American Red Cross is doing to assist hurricane victims in Texas and imminent victims in Florida. Our fellow Americans need our help and your donation, no matter how small, will make a difference.

If you’re a Stampin’ Up! customer and would like to help, Stampin' UP! will match your donation.  The Stampin’ Up! family invites you to help give to those who are now (or will soon be) trying to rebuild their lives. From now until the end of October, Stampin’ Up! will match donations made to the American Red Cross, dollar-for-dollar, for up to $50,000. 


Please click HERE to donate.


Together, we can do incredible things! Join me . . . because we truly can make a difference.


Do something creative today!


Thursday, September 7, 2017

Final Days to Save on Paper Pumpkin

September’s (gorgeous!) Paper Pumpkin kit can come straight to your door, complete with everything you need to make adorable, shareable projects—all for 50% off! Are you a new month to month subscriber?  Take advantage of this offer soon!

Join HERE and use promo code HALFOFF0917.  

Below are the contents from July and August Paper Pumpkin Kit. My favorite part is the small ink pads that come with each kit.  I love these!   They are so easy to use.  As you can see, sometimes you get two different colors.  Awesome!


Each kits also comes with directions to make about 20 cards/projects.  
If you don't like the card/project designs in the kit, check Pinterest.  You will find many many alternate projects/cards to make each month.   
-OR-
Call or email me to schedule a personal workshop.  Let's get creative together!


Do something creative today!

Monday, September 4, 2017

Freshly Made Sketches # 303 Anniversary Card


Hi, followers of Freshly Made Sketches.  Thanks for stopping by today! Hope you had a wonderful holiday weekend.  This past weeks FMS was perfect for an anniversary card I needed for my Son and Daughter-in-law.


Supplies used for this card include: white cardstock, Champagne Foil Sheets, Fancy Frost Specialty DSP, heart punches and Botanical Builder Thinlet die.

On the inside I stamped a verse from Funny Bones that says " A perfect marriage is just two imperfect people who refuse to give up on each other."  I love this verse.

I forgot to take a picture of the inside before I gave the card to my son.  LOL


Here is a close up of the flowers and hearts.


Do something creative today!

Debi


Saturday, September 2, 2017

Saturday Spotlight Gluten Free Apple Crisp

It's Saturday Spotlight time again. So glad you are joining me today!

Well, Summer is almost behind us.  Fall is just around the corner.  This change of season lures me from creating in my craft room to creating in the kitchen.  My family is elated!

One of their favorite’s desserts this time of year is apple crisp.  With apple season starting soon, I thought this would be the perfect time to share one of my family's favorites with all of you.

Creating this dish is always a family affair.  My husband Andy has charge of the apple peeler, corer.  That is his hand in the picture.  The younger family members love to play with/eat the apple skin strings as I gather ingredients to make the magic happen.

 This dish is not super sweet.  You can add an additional cup of dark brown sugar to the apples as you are layering or to the oatmeal topping as you are mixing.  Oh, before I forget,  this is a great breakfast dish!


Gather the following ingredients, grab your hubby and let’s get started.

9-10 large granny smith apples (peeled, cored and sliced)
4 cups of gluten free uncooked oatmeal (not instant or quick cook)
3 sticks of butter, melted
2 cups dark brown sugar
4-6 tbs. cinnamon (I love cinnamon and it's good for you!)
I tsp salt
2 tsp. vanilla
9 x 11 baking dish

Layer the sliced apples in the baking dish.  When the dish is about 1/3 full sprinkle the apples with cinnamon.  Repeat this step until the dish is full.  Don't worry about overspill in your oven, the apples will cook down as this bakes.

Mix the melted butter, oatmeal brown sugar, salt, vanilla and remaining cinnamon by hand in a large bowl until it is well mixed.  Let the mixture stand for 10 minutes and mix again.

Crumble the mixture over the apples.  Place in preheated oven at 375 degrees.  Bake for 45 minutes in the lowest part of the oven.  Half way through baking check and see if the topping is caramelizing too quickly. If so, cover with tin foil.

Let the dish cool before serving.  Some how this dessert never gets to cool at my house before someone sticks a spoon in to taste.  Vanilla ice cream or whipped cream is a great addition.  It also adds another food group to your breakfast.

Thanks for stopping by today.  Happy baking!

Do something creative today.

Debi